This is Zora my sourdough starter. I named her after Aunt Zora from my favorite TV show Frasier. She’s a larger size starter and is 1 year old. Zora loves being on a schedule. She’s fed twice a day with a 12 hour window between feedings. I feed Zora at 8am and 8pm everyday. Adjust a feeding schedule that works best for you. Example: 6am/6pm, 7am/7pm, 8am/8pm
👉Please note that I bake multiple loaves of bread a week using this method and no longer buy bread from the grocery store. I bake bread for both my family and myself, and the method below fits my needs.
If this amount of flour feels excessive, you can start a smaller starter with just 1 cup of flour and 1/2 cup of water. Once it’s established, you can store it in the fridge and feed it weekly as needed for baking.
Please note that this recipe calls for a ratio of 2 cups of flour to 1 cup of water as a general starting point. Feel free to add a little extra water to achieve a pancake batter consistency, adjusting as necessary. When I learned to make sourdough, I discovered that achieving the right pancake-like consistency was key. Experiment with texture and follow the recipe as a guideline as best as you can.👈
Let’s make your starter!👏
What You Need
- 2 cups of flour (organic unbleached all-purpose or whole wheat work best)
- Room temp water (filtered non-chlorinated)
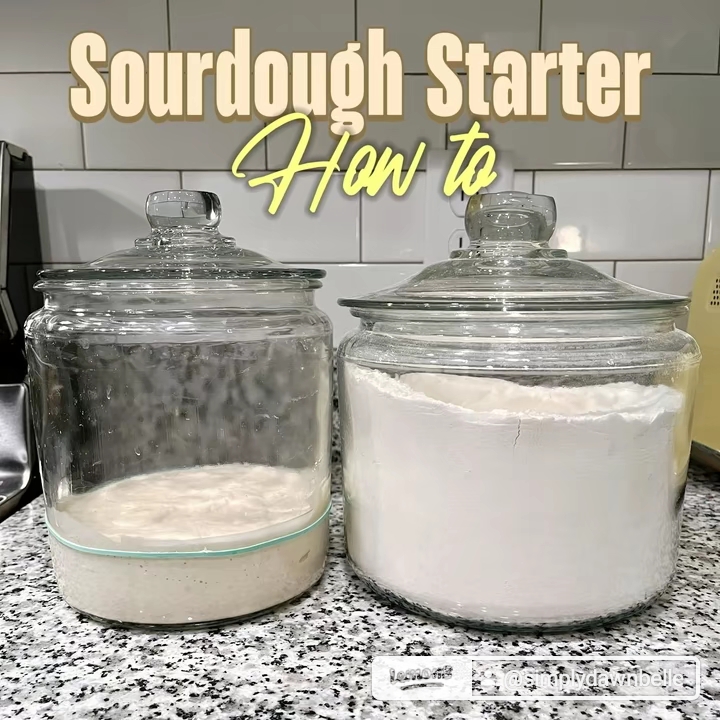
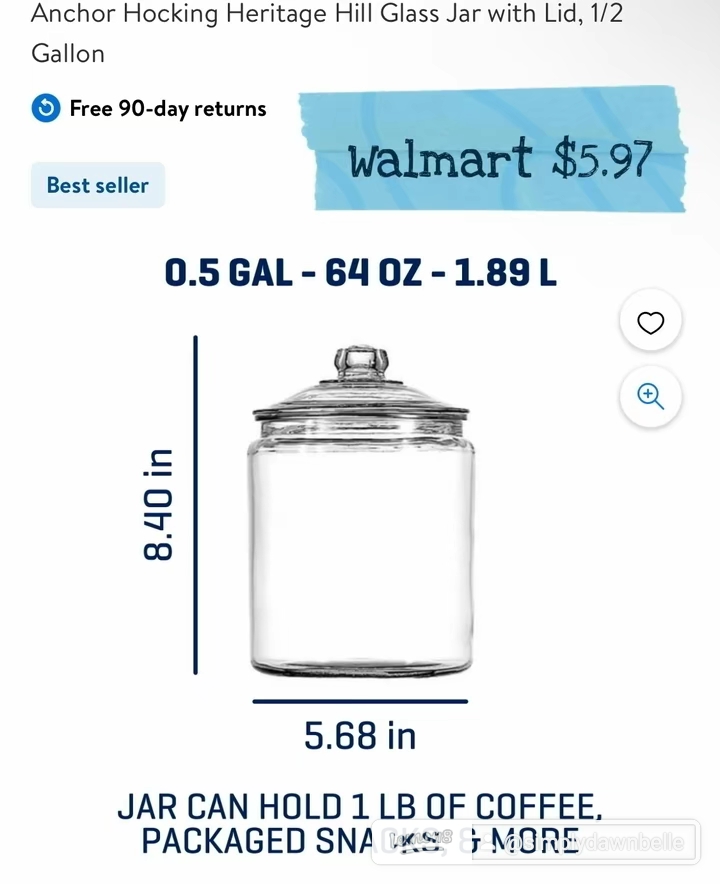
- Anchor Hawking 1/2 gallon 64 oz glass cookie jar (I got mine from Walmart for $5.97)
- Cotton towel, plastic shower cap, or coffee filter to cover the jar (If you are using the anchor hawking cookie jar, you can use the lid later once your starter is strong and established)
- Rubber band or string
- Plastic spatula
- Measuring cups (1/4 cup, 1/2 cup, 1 cup)

Instructions
- DAY 1: Mix Your Starter (8 am) In the clean jar, combine 1 cup of flour and 1/2 cup of water. Stir until it forms a thick, paste-like consistency. 👉👉It should be like pancake batter — add a little more water if it’s too thick/dry.👈👈 Use your spatula to scrape the sides and keep it clean as best you can. Cover the jar with a towel or coffee filter and secure it with a rubber band. Leave it at room temperature (70-75°F or 21-24°C).
- DAY 2: First Feeding (8 am)
• You may see some bubbles or notice a slight sour smell. This is a good sign!
• Discard 1/2 cup of the starter.
• Add another 1/2 cup of water and 1 cup of flour.
• Stir, cover, and leave it at room temperature.
⚠️ DO NOT put discard down the drain. It can clog your pipes over time. Throw out your discard in the trash can and wipe your spatula down with a paper towel.
- DAYS 3-5: Daily Feedings – 2x a day
• (8 am) Discard 1/2 cup of the starter, add 1/2 cup of flour and 1/4 cup of water.
• Stir well, cover, and leave it at room temperature.
• (8pm) Repeat.
Place a rubber band around the outside of the jar at the flat level of the starter. This band serves as a visual marker for the starting point. As the starter ferments and produces gas, it will expand and rise. The rubber band will stay in place, allowing you to easily see how much it has risen relative to the initial level. Over the next few days you should start seeing more bubbles and a tangy smell, indicating fermentation. The starter may double in size after each feeding.
- DAYS 6-7: Ready to Use
• When your starter is consistently rising and falling 4-6 hours after feedings, it’s ready to use. It should smell tangy, slightly yeasty, and have a bubbly texture. Please note that it may take longer than a week to establish a starter, it can sometimes take up to 3-4 weeks. I start my loaf recipe at 12pm after my starter has doubled in size from her 8am feeding.
🎉 Congrats on your sourdough starter! Stick to a feeding schedule everyday and you’ll be rewarded with a healthy, bubbly starter in no time. With patience and care, you’ll soon be able to bake delicious homemade bread! Keep it fed, keep it warm, and remember that consistency is key.
Enjoy the journey!
Notes
🥄 Altitude and kitchen temperature can affect sourdough starter by altering fermentation speed. Higher altitudes cause quicker rises due to lower air pressure, while warmer kitchens speed up yeast activity. Conversely, cooler temperatures slow fermentation, requiring adjustments in feeding frequency and warmth to maintain a healthy starter. For example I’m 1,200 ft above sea level and I keep my kitchen at 72 degrees. At 1,200 feet, the atmospheric pressure is slightly lower, which could cause the yeast to ferment a bit more quickly. This means my starter might bubble and rise a little faster than it would at sea level.
🥄Why I use a half gallon jar: The wide opening makes it easy to stir and feed, while the generous size allows plenty of room for future starter growth. It’s ideal for stockpiling discard for multiple recipes, providing ample space for natural fermentation and bubbling without risk of overflow. This larger capacity gives me the flexibility to collect larger amounts for batch cooking or baking projects.
🥄Maintaining your jar: To maintain a clean sourdough starter jar, always ensure the rim and the area just beneath it are free from goopy starter to prevent mold growth. You can use a damp paper towel to wipe the rim. To clean the jar, dip your spatula into a measuring cup of room-temperature filtered water, then use it to scrape down the sides. This helps remove any dried bits or buildup. I recommend doing this every couple of weeks or whenever necessary to keep your starter healthy and your jar tidy.
🥄Why I feed twice a day: Feeding twice a day is often recommended to keep it healthy and active. Here’s why frequent feeding helps:
Consistent Activity: Sourdough starter is a living culture of wild yeast and lactic acid bacteria. Regular feeding ensures they stay well-fed and active, leading to a predictable rise in your dough.
Preventing Acidity Buildup: Without regular feeding, waste products like acetic and lactic acids accumulate, making the starter too sour or acidic. Feeding twice daily helps balance acidity and maintain a pleasant flavor.
Stable Fermentation: Frequent feeding maintains a steady balance of yeast and bacteria. This balance is essential for consistent fermentation, which results in a more reliable rise and flavor profile for your bread. Reducing Hooch Formation: If a starter is not fed often enough, a layer of liquid (hooch) can form, indicating the starter is hungry. Twice-daily feeding reduces the chance of hooch formation and helps the starter remain vigorous. Ideal for Warm Environments: In warmer climates or kitchens, microbial activity increases, meaning the starter consumes food more quickly. Feeding twice daily ensures it doesn’t exhaust its nutrients too soon.
✈️🚗🛳️ Going out of town? If you’re heading out on vacation for 1-2 weeks, simply feed your starter as usual and let it rise at room temperature for about 3 hours. Then, place it in the fridge. I use an Anchor Hocking cookie jar with its original lid placed loosely on top for storage. Do not use a air tight lid. When you return, take the starter out and let it sit at room temperature for 4-6 hours before feeding it again. After feeding, give it 24 hours, and it should be fully revived and ready for baking.